Cardboard Method of Growing Mushrooms
One of the easiest and best ways to grow mushrooms is using the coffee-cardboard method. It doesn’t require pasteurization, so there aren’t extra steps in addition to the directions on growing.
Equipment
- Clean Juice Container or Tall Plastic Food Container
- Scissors
- Cardboard
- Plastic Bag
- Mixing Container
Materials
- Rubbing alcohol
- Oyster mushroom spores
- Freshly used coffee grounds
Instructions
- Rip up cardboard in small pieces (about the size of a quarter), then soak it in filtered water for at least 20 minutes. Although the cardboard may have bacteria in it, the spores should take over if there are enough spores in the mixture.
- Sterilize everything, including the juice bottle/container and mixing container. This will help prevent stronger bacteria from forming, which will steal the nutrients in the substrate.
- Cut the top of the juice bottle where the cap is—skip this if you are using a plastic food lid. Then poke 3 to 4 holes at the bottom of the bottle or container for humidity and airflow. DO NOT THROW OUT THE TOP.
- Add a few chunks of cardboard to the bottom of the bottle/container, then create the mushroom substrate by adding the cardboard with the used coffee grounds in a separate container. The coffee grounds should be warm, damp, and moist, but not soaking wet.
- Add some spores to the mixture but keep some on the side as well. You want around 8-10% of the entire mixture to be the mushroom spores. But, if you’re unsure, add a little more.
- Put a small 1-inch layer of the mixture on the bottom of the juice bottle/food container, then place a layer of spores. Repeat this step with the last layer being coffee and cardboard.
- Put the juice bottle top/container lid back on. This traps the moisture - it’s okay if there are gaps from where you cut. If you used a plastic food container, place the lid back on.
- Put a grocery bag or big freezer bag over it. If there is too much moisture and everything is wet and not damp, cut a few holes in the bag.
- Place the container in a dark, cool place, but NOT the refrigerator. Mushrooms love wet, dark places, so think about that as you grow them. Try to replicate exactly how they grow in the wild.
- Wait- in one to two weeks, the mushroom roots will start to form (mycelium) Check every other day to make sure there is moisture. Add moisture by spraying the lid or juice bottle top, as well as the plastic bag. Check for mold or any bacteria—throw it away and start over if there is any mold!
- Once mycelium forms, clusters will start to grow. Cut holes in the plastic food container to allow the mushrooms to grow through, or remove it if you can successfully control the moisture. For juice bottles, take off the top.
- Put the container in warm, indirect sunlight. Punch around 25 holes in a plastic bag and mist it, creating a mini humidity bubble around it. The holes help aerate the bag without losing moisture.
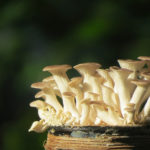
- In around 4 to 5 days, you’ll have oyster mushrooms! Once you understand the growing process, you can grow them in virtually any container.
- Sanitize every single place that the mushroom spores have touched, just in case.